Our Thoughts...
Selected Article
Don't be deceived by this seemingly simple crown miter
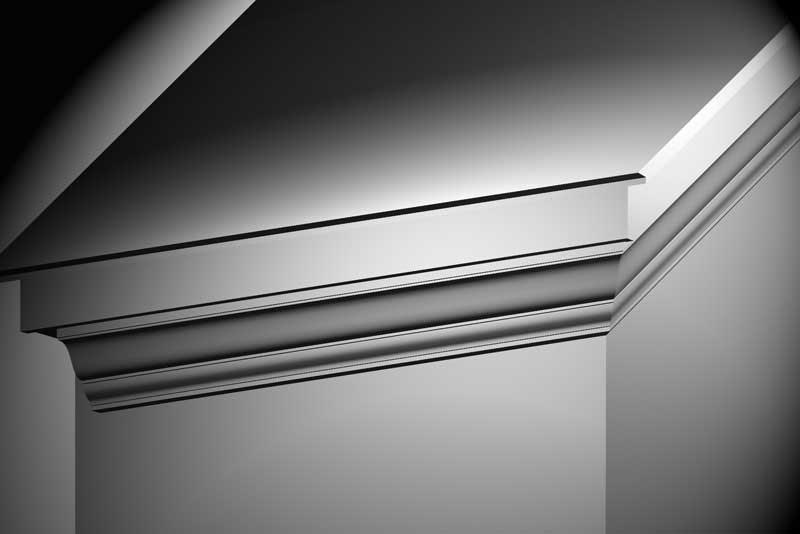
An architect wants a more updated or stylish look for an exterior cornice, not the usual box returns so commonly used in traditional styles. He'd like the eave crown to miter into the rake crown to create a clean, consistent look (as shown in the illustration at right). This seems simple enough, just miter the crown at the transition from eave to rake. It's often assumed that the eave crown and rake crown are the same profile, they are not. The problem is usually discovered later in the field, with frustrated trim carpenters standing next to a pile of expensive kindling. The truth is, the rake crown is actually quite different in size and shape from the eave crown, and it's determined by the pitch of the roof. This article will teach you how to find the correct rake profile to properly miter into your chosen eave crown.
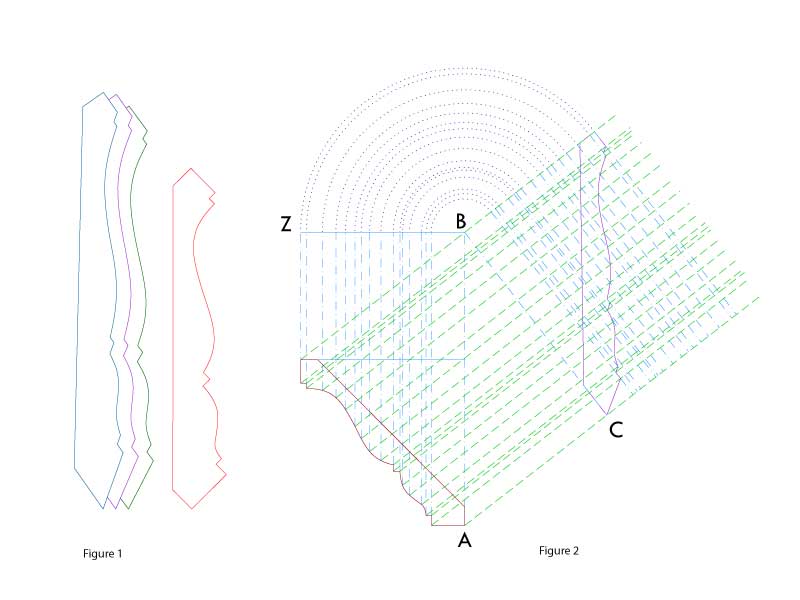
To see how the pitch of the roof dictates the size and shape of the rake moulding, let’s say that AB503 crown was the moulding chosen for the eave. Looking at the illustrations at right (figure 1), the profile on the right in red (just right of the group of three profiles) is our AB503. The group of three profiles from right to left are the rake profiles for 6/12, 9/12, and 12/12 pitches respectively. Note that they are dramatically larger than the eave crown AB503, illustrating the impossibility of mitering the same crown. And although the rake moulding profiles don’t appear to be that different from each other, small differences in profile turn into big differences when mitering. Therefore, it is essential to create a custom profile for each pitch.
To do that, take the profile of the eave crown and draw it in its correct orientation - as it would appear when installed (see bottom left profile in figure 2). Next, draw lines parallel with the line of the rake - in other words, at the desired pitch (dashed lines in figure 2). Be sure to draw these rake lines from every prominent point on the eave profile, and then more or less evenly spaced across other areas of the profile. Draw line AB as shown to represent the plumb line, and BZ to represent the level line. Then draw plumb lines (dash dot lines in figure 2) from every point on the profile where the rake lines intersect, up to line BZ. Now draw line BC square (90°) to the uppermost rake line. Using B as the radius point, transfer each plumb line at line BZ with an arc (dotted lines in figure 2) to the uppermost rake line. Now draw down square lines (parallel with BC) to the bottom rake line. Next, draw lines connecting where the rake and plumb lines intersect to reveal the rake profile (profile on the right in figure 2). Obviously, areas that are curved in the eave crown need to be curved in the rake crown, and lines that are straight in the eave crown need to be straight in the rake crown.
Use this method wherever the mouldings to be mitered are on two different planes (rake / eave miter illustration) - that is both the “wall plane” and “ceiling plane” are not the same. If either plane is the same, the same moulding can be used in a miter. This would be the case, for example, where a hip eave crown turns the corner and continues down the adjoining hip eave. They have a different wall plane, but the ceiling plane is the same. It's also the case at the gable peak, where rake mouldings miter together. They have a different ceiling plane, but the wall plane is the same. This applies to flat mouldings as well as pitched mouldings, and is true whether the detail is on the exterior or interior.

