Our Thoughts...
Selected Article
Proper scarf joints on crown mouldings
I marvel at the craftsmanship artisans possessed 60 or more years ago; joints as tight today as when they were first fitted. That's quite a feat when you consider how wood is affected by seasonal fluctuations in temperature and humidity. It also highlights an important concern that some installers ignore: minimize the length of joints to minimize the effects of shrinking and swelling wood.
I have visited many job sites where scarf joints on crowns are cut just like an inside mitre, 45° across the face with a 45° back taper. I suspect it's because the trim carpenter did not want to change the settings on the compound mitre saw just to cut a scarf joint. There are a couple of reasons why this is a bad practice. First, it creates a long, unsightly joint across the face of the crown, drawing attention to the joint, which is never a good thing. Second, the longer the joint the more susceptible it is to the effects of wood movement caused by fluctuations in temperature and humidity.
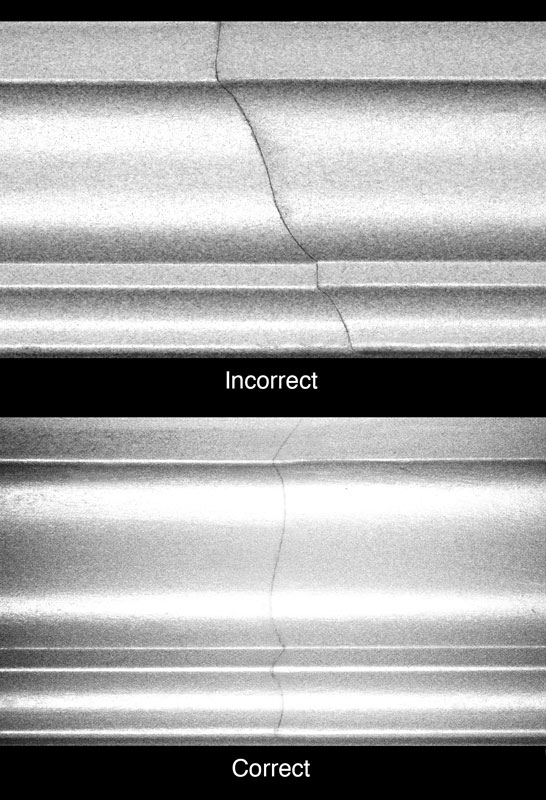
A proper scarf joint should be cut at 90° across the face, with a 45° back taper. The joints are easier to cut, and feather sanding or scraping can nearly hide the joint. More importantly though, proper scarf joints are less affected by seasonal changes in temperature and humidity, because they are shorter.
The image at right shows two scarf joints, one incorrect, the other correct. Done correctly, the scarf joint for this 3-1/4" wide crown moulding is 3-1/4" long, done incorrectly it is nearly 4-5/8" long. For a large, 7" wide crown, an incorrect scarf joint would be nearly 10" long. An incorrect scarf joint is 41% longer than a correct one; that's quite a difference.
